Secure your Spring Boot Application with Asgardeo


Asgardeo provides several authentication and authorization mechanisms with different open standards. This blog will focus on securing a simple spring boot web application with Asgardeo using OpenID Connect.
It will take only a few simple steps to create a simple spring boot web application using Spring boot boilerplate and secure it using the OpenID Connect via Asgardeo.
To get started, you need to have supported development platforms. I’m trying this sample app with Spring Boot 2.5.5 release. You need to,
* Download, and install Apache Maven (3.6.x or higher) as the package manager if you already haven’t.
* Configure JDK 11.
Generate a spring boot application
- You can directly go to https://start.spring.io/ and add the relevant dependencies and create the project. You can check the quickstart of spring.io https://spring.io/quickstart
- Provide Group, Artifact, Name, and Description
- Click Add Dependencies and add the following dependencies
Developer Tools: Spring-boot-devWeb: spring-webTemplate Engines: ThymeleafSecurity: spring-security, oauth2-client
3. Click Generate and download your spring boot application.
4. You will get a zipped maven project, unzip it to build your app.
Before getting started, create a web application in Asgardeo
To get started with securing your spring boot app using Asgardeo, first of all, you need to create an application in Asgardeo.
- Login to Asgardeo Console.
- Go to Develop > Applications.
- Click New Application.
- Choose Traditional Web Application and Choose OpenID Connect.
- Provide App name and configure http://localhost:8080/login/oauth2/code/asgardeo as the Authorized redirect URLs.
- Go to Protocol and obtain a Client ID and Client Secret
Refer to register an OpenID Connect web app in Asgardeo for further information.
Add authentication to your spring boot application
Creating a Spring boot application and securing it is very simple. Now let’s see the important default files.
- Java class files in src/main/java
- DemoApplication.java: The entry point for the entire app and Loads the Spring Boot framework
2. Thymeleaf template files in src/main/resources/templates
3. src/main/resources/application.properties
Step1: Now let’s create AppController.java in the src/main/java directory. It is our basic controller class and it maps requests to Thymeleaf template files.
@Controller
class AppController {@GetMapping("/")
public String currentUserName(Model model, Authentication authentication) {
DefaultOidcUser userDetails = (DefaultOidcUser) authentication.getPrincipal();
model.addAttribute("userName", userDetails.getName());
model.addAttribute("IDTokenClaims", userDetails);
return "home";
}}
Step2: Now create a home.html file inside src/main/resources/templates folder to get the responses and map them in the UI.
<head>
<metacharset=”UTF-8" >
<title>App</title>
</head>
<h1>Welcome to MyApp</h1>
<!DOCTYPE html><html xmlns=”http://www.w3.org/1999/xhtml" xmlns:th=”http://www.thymeleaf.org">
<div>
You are successfully logged in as
<span style=”font-weight:bold” th:text=”${userName}”></span>
</div>
<div>
Claims found in the ID token
<div><span style=”font-weight:bold” th:text=”${IDTokenClaims}”></span></div>
</div>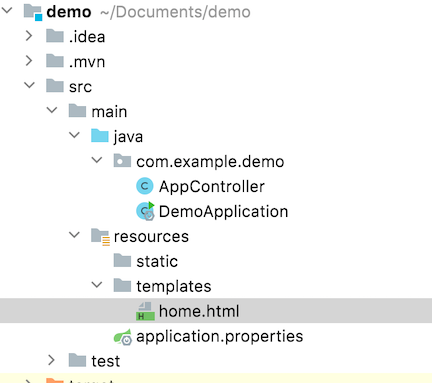
Now the folder structure looks like as shown here.
Step3: Now you need to apply the application-related configs and Asgardeo URL in the application.properties file
- Add client ID and client secret as shown below in the application.properties file
- Get the Asgardeo organization in which the application resides and change that in the issuer_uri of Asgardeo org as shown below.
#OAuth Application Properties
spring.security.oauth2.client.registration.asgardeo.client-name=Asgardeo
spring.security.oauth2.client.registration.asgardeo.client-id={app_client_id}
spring.security.oauth2.client.registration.asgardeo.client-secret={app_client_secret}
spring.security.oauth2.client.registration.asgardeo.redirect-uri={baseUrl}/login/oauth2/code/asgardeo
spring.security.oauth2.client.registration.asgardeo.authorization-grant-type=authorization_code
spring.security.oauth2.client.registration.asgardeo.scope=openid#Asgardeo Properties
spring.security.oauth2.client.provider.asgardeo.issuer-uri=https://api.asgardeo.io/t/{your_organization_name}/oauth2/token
Refer to sample configs https://github.com/piraveena/Spring-boot-sample-app/blob/master/src/main/resources/application.properties
Now you have completed the Asgardeo integration with the spring boot application. Let’s run the app and see
Run the spring boot application
- Start your spring boot application using the below command.
mvn clean spring-boot:run2. Now access http://localhost:8080/login
You will be directed to the Asgardeo login page. Once you log in to Asgardeo as a customer user, you’ll be directed to a page that shows your user-id and claims from the ID token.
This is a simple application. You have secured your OpenID Connect spring boot application with Asgardeo now.
Refer to the sample app here.
Awesome!!
Now that you have connected your spring boot app for authentication with Asgardeo. MFA and conditional authentication are just a few clicks away. Check out them to add an additional layer of security to your app.
Reference
https://wso2.com/asgardeo/docs/guides/applications/register-oidc-web-app/