X509 Authenticator in WSO2 IS with SSL Termination

What is SSL Termination/ Bridging?

SSL bridging is a process where a device, usually located at the edge of a network, decryptsSSL traffic and then re-encrypts it before sending it on to the Web server. SSL bridging can be useful when the edge device performs deep-packet inspection to verify that the contents of the SSL-encrypted transmission are safe, or if there are security concerns about unencrypted traffic traversing the internal network [1].SSL bridging enables NGINX to decrypt client requests when passing the request to a Identity Server.
Why a separate Valve is needed for X509 Authentication to work in SSL Termination?
In the normal SSL Termination, X509 Authentication won’t work. Because, NGINX will decrypt the request and won’t pass the X509 Certificate as a request attribute to the server. So server can’t authenticate the client using its certificate. So X509 authentication will fail.
So we need a separate valve to handle the the request from the NGINX and pass the X509Certificate as a request attribute to the server. So here we have to configure the NGINX to pass the SSL Certificate as a request header.
Lets see how to configure X509Authenticator in Identity Server with SSL Termination using NGINX.
To configure X509Authenticator with SSL Termination using NGINX and WSO2 Identity Server, you have to follow the following steps:
- Configuring NGINX sor SSL Termination
- Configuring proxy ports in IS
- Change the authentication SAML endpoint in travelocity sample
- Configuring X509 Authenticator for WSO2 Identity Server
- Adding X509 Authetication Valve of WSO2 Identity Server
Let’s see these steps in detail.
1. Configuring NGINX for SSL termination
- Install NGINX 1.15.8 community version (Click here for the Link to install on mac)
- Create a ssl directory inside /usr/local/etc/nginx/.
- Create a self-signed key and certificate for NGINX and put them into /usr/local/etc/nginx/ssl/;
openssl req -newkey rsa:2048 -new -nodes -keyout key.pem -x509 -days 365 -out nginx.pemopenssl x509 -text -noout -in nginx.pem
4. Add the following configurations. (In place the client certificate in /usr/local/etc/nginx/ssl/ and define its path in ssl_client_certificate)
http {
  upstream wso2.is.com{
    server localhost:9443;
    ip_hash;
  }
  # HTTPS server
  server {
    listen 443 ssl;
    server_name localhost;
    #nginx certificate
    ssl_certificate /usr/local/etc/nginx/ssl/nginx.pem;
    #nginx key
    ssl_certificate_key /usr/local/etc/nginx/ssl/key.pem;
    #certificate of the client
    ssl_client_certificate /usr/local/etc/nginx/ssl/certificate.pem;
    ssl_session_timeout 50m;
    ssl_protocols TLSv1 TLSv1.1 TLSv1.2;
    ssl_ciphers HIGH:!aNULL:!MD5;
    ssl_verify_client on;
    ssl_prefer_server_ciphers on;
    location / {
      #to enable the nginx to pass request header
      proxy_pass_request_headers on;
      proxy_set_header X-HTTPS-Protocol $ssl_protocol;
      proxy_set_header X-SSL-CERT $ssl_client_cert;
      proxy_pass https:/wso2.is.com;
    }
  }
}
2. Configuring the Proxy Port in IS nodes
By default, WSO2 Identity Server runs on 9443 port. The following steps describe how you can configure a proxy port of 443.
- Open <wso2is-5.3.0>/repository/conf/tomcat/catalina-server.xml file and add the proxy port 443 in https connector as follows.
It is not possible to configure proxy port from load balancer itself since there is a post request while authenticating to IS Dashboard. So, If you are planning to use Identity server Dashboard, you must do this configuration. Below configurations are also needed if you are using the dashboard.
3. Change the authentication endpoint in travelocity sample
Since the nginx listens to port 4443, we need to change authentication endpoint in client side.
- Go to <Catalina_Home>/Webapps/travelocity.com/WEB-INF/classes/travelocity properties
Change the SAML2.IdPURL as https://localhost:443/samlsso
4. Configuring X509 Authenticator in WSO2 Identity Server
If you haven’t configured X509 Authenticator, first configure that using this blog (Click here [2])
5. Adding X509 Authetication Valve of WSO2 Identity Server
- Get a clone from https://github.com/wso2-extensions/identity-x509-commons.git
git clone https://github.com/wso2-extensions/identity-x509-commons.git2. If the current branch is not master, Checkout to the branch —master
git branch checkout master3. Build the component
mvn clean install4. Place the org.wso2.carbon.extension.identity.authenticator.x509Certificate.valve-1.0.4-SNAPSHOT.jar .jar file ( /identity-x509-revocation/component/valve/target/org.wso2.carbon.extension.identity.x509Certificate.valve-1.0.4-SNAPSHOT.jar) into <IS_HOME>/repository/components/dropins/ directory. (Check whether the version of x509revocation component in the IS pack and change its version to 1.0.4-SNAPSHOT)
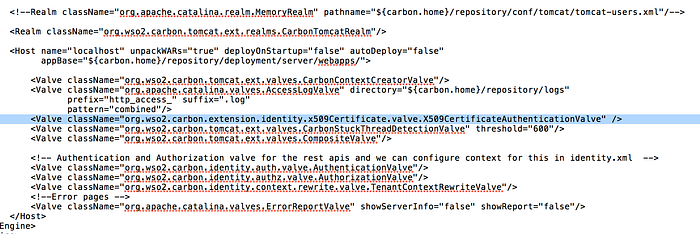
5. Go to <IS_HOME>/repository/conf/tomcat/ directory and open catalina.xml file. Add the new valve in the configuration file. Valve name = <Valve className=”org.wso2.carbon.extension.identity.x509Certificate.valve.X509CertificateAuthenticationValve” />
6. Configure in identity.xml file in <IS_HOME>/repository/conf/identity/identity.xml as follows.
Add the following block and add the HTTP request header name which passes the X509Certificate within the <X509RequestHeaderName> block.
<!--X509 Certificate based authentication configuration-->
<X509>
   <!--HTTP request header name which passes the X509Certificate  from LB-->
   <X509RequestHeaderName>SSL-CERT</X509RequestHeaderName></X509>
This <X509RequestHeaderName> should be same as the one configured in NGINX.
7. Now run the travelocity sample and it will be authenticated using X509 Certificate when SSL termination is configured.
For testing, please check the document [3].